

Most founders assume connecting a backend to their frontend is a multi-day engineering task. With the right BaaS platform, it’s not. In this backend as a service tutorial, you’ll see how the setup process for authentication, database access, and file storage can realistically be completed in a single focused workday — even if you’re not a backend engineer.
If you’re still deciding which platform to build on before diving into this backend as a service tutorial, check out the complete guide to the best backend-as-a-service for startups. It gives you the full comparison to make that call confidently.
Backend-as-a-service tutorial: connect your stack in under a day
This is a practical walkthrough. By the end of it, you will have a working connection between your frontend and a BaaS backend — including user authentication, database read and write operations, and file storage. The examples use both Firebase and Supabase so you can follow along on whichever platform you have chosen.
The goal is not to show you every feature. The goal is to get you to a functional, connected stack as fast as possible.
What you need before you start
backend as a service tutorial , Before writing any code, you need three things in place.
A frontend project — This tutorial assumes you are working with a JavaScript or TypeScript frontend. React is used in the examples, but the SDK calls translate directly to Vue, Svelte, or vanilla JavaScript with minimal adjustment.
A BaaS account — Create a free account on either Firebase at console.firebase.google.com or Supabase at app.supabase.com. Both free tiers are sufficient for everything covered in this tutorial.
A package manager — npm or yarn. You will install the platform SDK as a dependency in your frontend project.
That is it. No server setup. No DevOps configuration. No cloud credentials to manage beyond the API keys the platform generates for you.
Step 1: create your project and get your credentials
On Firebase:
Navigate to the Firebase console and click “Add project.” Give it a name, disable Google Analytics if you do not need it for now, and click through to project creation. Once the project is ready, click the web icon to register your app. Firebase will generate a configuration object that looks like this:backend as a service tutorial
const firebaseConfig = {
  apiKey: "your-api-key",
  authDomain: "your-project.firebaseapp.com",
  projectId: "your-project-id",
  storageBucket: "your-project.appspot.com",
  messagingSenderId: "your-sender-id",
  appId: "your-app-id"
};
Copy this object. You will use it to initialize the SDK in your frontend project.
On Supabase:
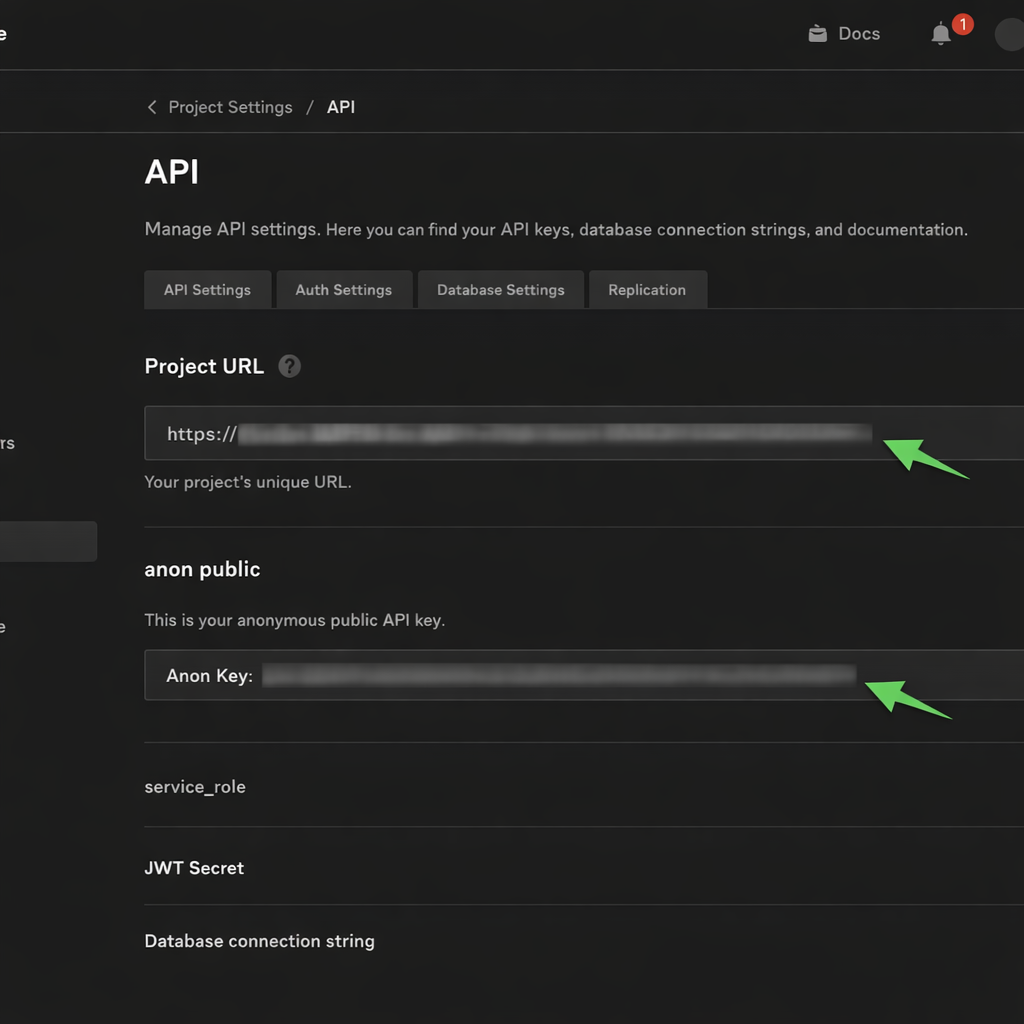
Navigate to app.supabase.com and click “New project.” Choose your organization, give the project a name, set a database password, and select a region close to your users. Once the project is provisioned — this takes about two minutes — go to Project Settings, then API. You will find two values you need: your project URL and your anon public key.
const supabaseUrl = 'https://your-project.supabase.co';
const supabaseKey = 'your-anon-public-key';
Store both values in your project’s environment variables. Never hard-code API keys directly in your source files.
Step 2: install the SDK and initialize the connection
Firebase:
In your frontend project directory, run:
npm install firebaseCreate a file called firebase.js in your project’s source folder and add the following:
import { initializeApp } from 'firebase/app';
import { getAuth } from 'firebase/auth';
import { getFirestore } from 'firebase/firestore';
import { getStorage } from 'firebase/storage';

const firebaseConfig = {
  // paste your config object here
};

const app = initializeApp(firebaseConfig);

export const auth = getAuth(app);
export const db = getFirestore(app);
export const storage = getStorage(app);
This single file initializes all three services you will use — authentication, database, and storage — and exports them so any component in your project can import them directly.
Supabase:
In your frontend project directory, run:
npm install @supabase/supabase-jsCreate a file called supabase.js and add:
import { createClient } from '@supabase/supabase-js';

const supabaseUrl = process.env.REACT_APP_SUPABASE_URL;
const supabaseKey = process.env.REACT_APP_SUPABASE_ANON_KEY;

export const supabase = createClient(supabaseUrl, supabaseKey);
Both setups follow the same pattern: one initialization file, exported client instances, environment variables for credentials. From this point forward, every feature you add imports from this file.
Step 3: implement user authentication
Authentication is almost always the first feature a product needs. Here is how to implement email and password sign-up on both platforms.
Firebase auth:
javascript
import { auth } from './firebase';
import { createUserWithEmailAndPassword, signInWithEmailAndPassword } from 'firebase/auth';

// Sign up
const signUp = async (email, password) => {
  const userCredential = await createUserWithEmailAndPassword(auth, email, password);
  return userCredential.user;
};

// Sign in
const signIn = async (email, password) => {
  const userCredential = await signInWithEmailAndPassword(auth, email, password);
  return userCredential.user;
};
Supabase auth:
import { supabase } from './supabase';

// Sign up
const signUp = async (email, password) => {
  const { data, error } = await supabase.auth.signUp({ email, password });
  return { data, error };
};

// Sign in
const signIn = async (email, password) => {
  const { data, error } = await supabase.auth.signInWithPassword({ email, password });
  return { data, error };
};
Both implementations handle the network request, session management, and token storage automatically. You call the function, and the platform handles everything underneath.
To add Google OAuth on either platform, you enable the provider in the dashboard — Firebase under Authentication > Sign-in method, Supabase under Authentication > Providers — and add one additional function call in your code. The platform handles the OAuth redirect flow entirely.
Step 4: read and write data to your database
Firebase Firestore — writing data:
import { db } from './firebase';
import { collection, addDoc, getDocs } from 'firebase/firestore';

// Write a document to a collection
const addItem = async (data) => {
  const docRef = await addDoc(collection(db, 'items'), data);
  return docRef.id;
};

// Read all documents from a collection
const getItems = async () => {
  const querySnapshot = await getDocs(collection(db, 'items'));
  return querySnapshot.docs.map(doc => ({ id: doc.id, ...doc.data() }));
};
Supabase — writing and reading data:
import { supabase } from './supabase';
// Insert a row
const addItem = async (data) => {
const { data: result, error } = await supabase
.from('items')
.insert(data);
return { result, error };
};
// Select all rows
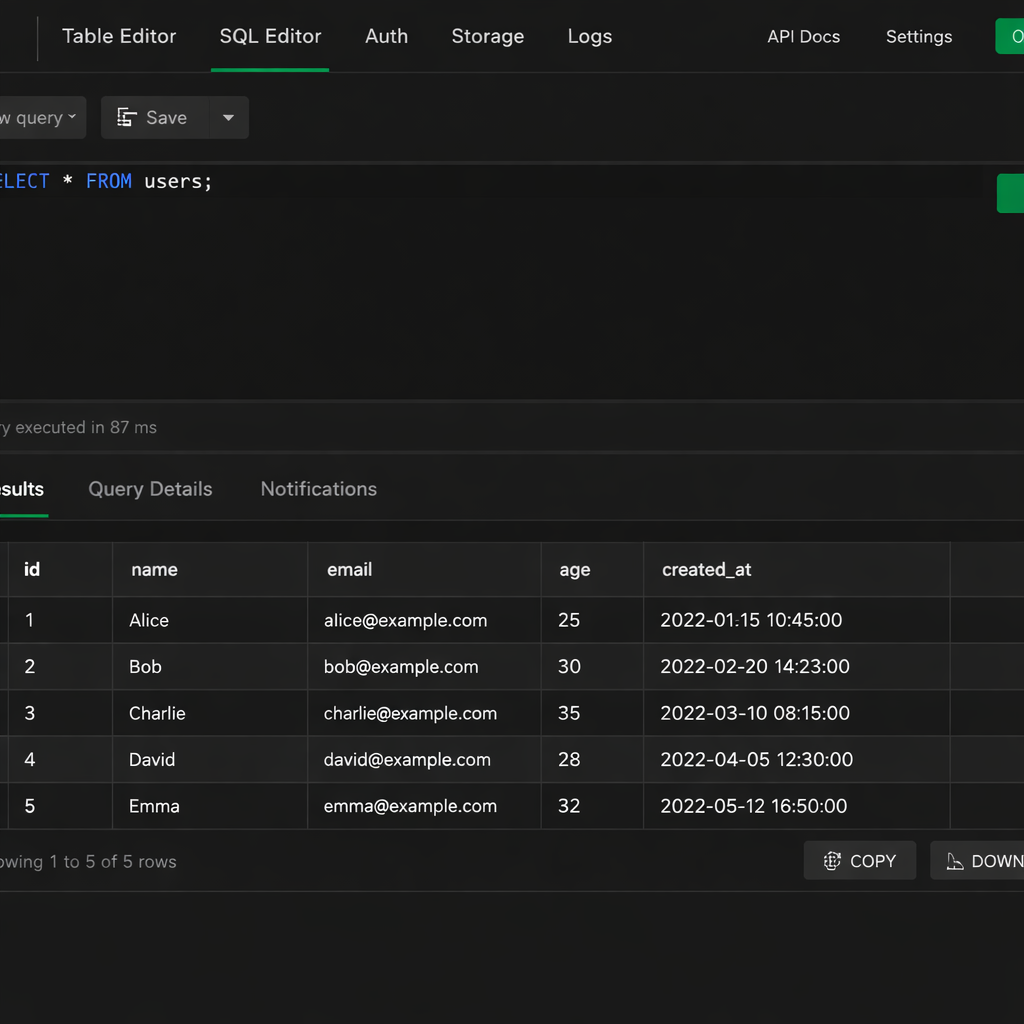
const getItems = async () => {
const { data, error } = await supabase
.from('items')
.select('*');
return { data, error };
};The Supabase syntax is intentionally similar to SQL. If you have worked with any SQL database before, the query builder will feel familiar immediately. Firebase’s syntax is more abstracted — you work with collections and documents rather than tables and rows.
For a deeper look at how these two data models compare and which fits your product better, the Firebase vs Supabase vs AWS Amplify breakdown covers the architectural differences in detail.
Step 5: handle file uploads and storage
Most products need file storage at some point — profile pictures, document uploads, media attachments. Both platforms handle this through their storage services.
Firebase Storage:
import { storage } from './firebase';
import { ref, uploadBytes, getDownloadURL } from 'firebase/storage';

const uploadFile = async (file, path) => {
  const storageRef = ref(storage, path);
  const snapshot = await uploadBytes(storageRef, file);
  const downloadURL = await getDownloadURL(snapshot.ref);
  return downloadURL;
};
Supabase Storage:
import { supabase } from './supabase';

const uploadFile = async (file, bucket, path) => {
  const { data, error } = await supabase.storage
    .from(bucket)
    .upload(path, file);

  if (error) return { error };

  const { data: urlData } = supabase.storage
    .from(bucket)
    .getPublicUrl(path);

  return { url: urlData.publicUrl };
};
Both implementations follow the same pattern: reference a storage location, upload the file, retrieve a public URL. The URL is what you store in your database and serve to your users.
Access control rules for storage are configured in the platform dashboard — not in your code. Firebase uses security rules written in a custom syntax. Supabase uses Row Level Security policies written in SQL. Both approaches let you define exactly which users can read or write which files.
What a Complete Day-One Setup Looks Like in This Backend as a Service Tutorial
By the end of a focused workday following this backend as a service tutorial, a founder will have:
- A frontend project connected to a BaaS backend
- Working email and password authentication
- Google OAuth configured and functional
- Database read and write operations running
- File upload and retrieval working
- All credentials stored in environment variables
- No server managed, no deployment pipeline configured beyond the platform’s built-in hosting
That’s a production-ready backend foundation — not a prototype or demo. A real backend ready for actual users from day one.
The next conversation after completing this setup in the backend as a service tutorial is usually cost. As your user base grows, your BaaS bill scales with it — and the rate depends heavily on platform choice and query structure. Our backend-as-a-service pricing breakdown models exact costs at different growth stages, so you can plan ahead before surprises hit.
The Bottom Line
Connecting a BaaS platform to your frontend is not a multi-day engineering project. In this backend as a service tutorial, you’ve seen it’s a series of well-documented steps that any technically capable founder can complete in a single focused sitting. The platforms are intentionally designed for exactly this — fast onboarding, clear SDKs, sensible defaults, and minimal configuration required.
The real complexity usually arrives later, when your product scales and your architecture must evolve with real user growth. That’s a good problem — the kind you only face after validating that what you’re building actually matters.
By following this backend as a service tutorial, you’ve now laid a production-ready foundation in hours instead of weeks. Use that time advantage to iterate fast, talk to users, and prove product-market fit. Scaling challenges can wait — you’ve already solved the hardest part for most early-stage teams.