

Most entrepreneurs who self-host their backend spend the first week focused entirely on getting the platform running. Authentication works, the database is up, the first API call returns data — and the infrastructure checklist feels complete. Self-hosted backend security rarely makes it onto that initial list, and that gap is where the serious problems begin self-hosted backend security.
An unprotected self-hosted backend is not a theoretical risk. Open ports, default credentials, and unrotated secrets are the three most common entry points for automated attacks that scan the public internet continuously. A VPS with a freshly installed Appwrite, Nhost, or Parse Server instance and no hardening applied is discoverable and exploitable within hours of provisioning.
This guide covers the specific security configurations every self-hosted backend requires before it serves real users — firewall rules, secrets management, access controls, SSL enforcement, and the monitoring setup that tells you when something is wrong before your users do.
Why self-hosted backend security requires deliberate configuration
Managed platforms handle a significant portion of infrastructure security on your behalf. SSL termination, DDoS mitigation, secrets encryption at rest, and network isolation are all configured and maintained by the platform’s operations team. When you self-host, those responsibilities transfer to you entirely.
That transfer is not a reason to avoid self-hosting. The complete guide to open-source BaaS self-hosting: Appwrite, Nhost, and Parse makes the case for why self-hosting is the right infrastructure decision for most bootstrapped founders in 2026. The security configuration covered in this guide is the completion of that decision — the step that makes a self-hosted deployment production-ready rather than just technically operational.
The good news is that the hardening steps required for a lean self-hosted backend security configuration are not complex. They are specific, they are documented, and most of them take under thirty minutes to implement. The founders who skip them are usually not doing so deliberately — they simply did not know which steps were non-negotiable self-hosted backend security.
Firewall configuration: the first line of self-hosted backend security
A VPS provisioned from any major provider — Hetzner, DigitalOcean, or Vultr — exposes every port to the public internet by default. Your backend platform opens additional ports during installation. Without a firewall restricting inbound traffic to only the ports your application requires, your server’s entire port surface is reachable by anyone on the internet self-hosted backend security.
UFW, the uncomplicated firewall included with Ubuntu, handles this with four commands:
ufw default deny incoming
ufw default allow outgoing
ufw allow OpenSSH
ufw allow 80/tcp
ufw allow 443/tcp
ufw enable
This configuration blocks all inbound traffic except SSH on port 22, HTTP on port 80, and HTTPS on port 443. Every other port — including the database ports, the Docker internal service ports, and any development ports your BaaS platform exposes — is inaccessible from outside the server.
Restricting SSH access
The default SSH configuration accepts password authentication from any IP address. Two changes harden this significantly.
First, disable password authentication entirely and require SSH key authentication instead. Edit /etc/ssh/sshd_config and set PasswordAuthentication no. Restart the SSH service to apply the change. From this point forward, only clients with the corresponding private key can authenticate — brute force password attacks against your SSH port produce no results.
Second, if your development setup uses a consistent IP address or a VPN with a fixed exit IP, restrict SSH access to that IP in your UFW rules:
ufw delete allow OpenSSH
ufw allow from your.static.ip.address to any port 22
This eliminates SSH as an attack surface for any traffic originating outside your known IP range.
![]()
Secrets management: rotating credentials before they become liabilities
Every BaaS platform generates secrets during installation — master keys, JWT signing secrets, database passwords, and API keys for connected services. The default values generated at installation time are random and unique per deployment, which is a reasonable starting point. The problem is that many founders never rotate those secrets after the initial setup, and never audit which services have access to them.
Appwrite secrets
Appwrite’s installation generates a master key stored in the Docker Compose environment file at appwrite/.env. The master key grants unrestricted access to every project and every piece of data in your Appwrite instance. It should never appear in your application’s frontend code, should never be committed to a Git repository, and should be rotated on a schedule — quarterly is a reasonable baseline for an early-stage product self-hosted backend security.
To rotate the Appwrite master key, update the _APP_OPENSSL_KEY_V1 value in your .env file and restart the Appwrite stack. Appwrite re-encrypts sensitive data with the new key on restart.
Nhost secrets
Nhost’s JWT secret — used to sign and verify authentication tokens — lives in the project’s .env file as HASURA_GRAPHQL_JWT_SECRET. Rotating this secret invalidates all existing user sessions, which means users will be logged out on the next request after the rotation takes effect. Plan rotations during low-traffic periods and communicate the session reset to your users if your product has active daily users who would notice an unexpected logout.
The Nhost self-hosted configuration details, including the full list of environment variables that carry sensitive values, are covered in the Nhost self-hosted GraphQL and Postgres guide.
Parse Server secrets
Parse Server’s masterKey is the highest-privilege credential in the system. Any request that includes the master key bypasses all access control rules and can read, write, or delete any object in any class. It should exist only in your server-side cloud functions and your administrative tooling — never in a mobile app binary or a frontend JavaScript bundle where it can be extracted.
Parse Server also generates a clientKey for frontend SDK authentication. The client key provides limited access governed by your class-level permissions and should be treated as a semi-public credential — do not embed secrets in requests that use only the client key, and configure your class-level permissions to enforce the minimum access your application requires.
Access control configuration for each platform
Self-hosted backend security at the data layer means configuring your BaaS platform so that each user, role, and service can access only the data it legitimately requires. Default configurations on all three platforms are permissive — appropriate for development, not for production.
Appwrite permissions
Appwrite enforces permissions at the collection and document level. The default permission on a new collection allows any authenticated user to read and write any document. For a multi-tenant SaaS product, this means every user can read every other user’s data until you explicitly restrict it.
Configure collection permissions to restrict read and write access to the document owner:
- Read:
user:[userId] - Write:
user:[userId]
For data that should be readable by all authenticated users but writable only by administrators, set read to users and write to team:[adminTeamId]. The Appwrite self-hosted permissions model is covered in more detail in the Appwrite self-hosted setup guide.
Hasura row-level security in Nhost
Nhost’s Hasura layer enforces permissions at the GraphQL query level, with rules that translate directly to SQL WHERE clauses at the database layer. A user role on a workspaces table with a select permission condition of owner_id: {_eq: "X-Hasura-User-Id"} means the GraphQL API physically cannot return a workspace owned by a different user, regardless of how the query is constructed self-hosted backend security.
Audit your Hasura permission configuration before going to production by testing each role’s access with the Hasura Console’s API Explorer. Switch the role context in the explorer header and attempt queries that should be blocked — a well-configured permission system returns empty results or permission denied errors for out-of-scope queries rather than filtering them at the application layer.
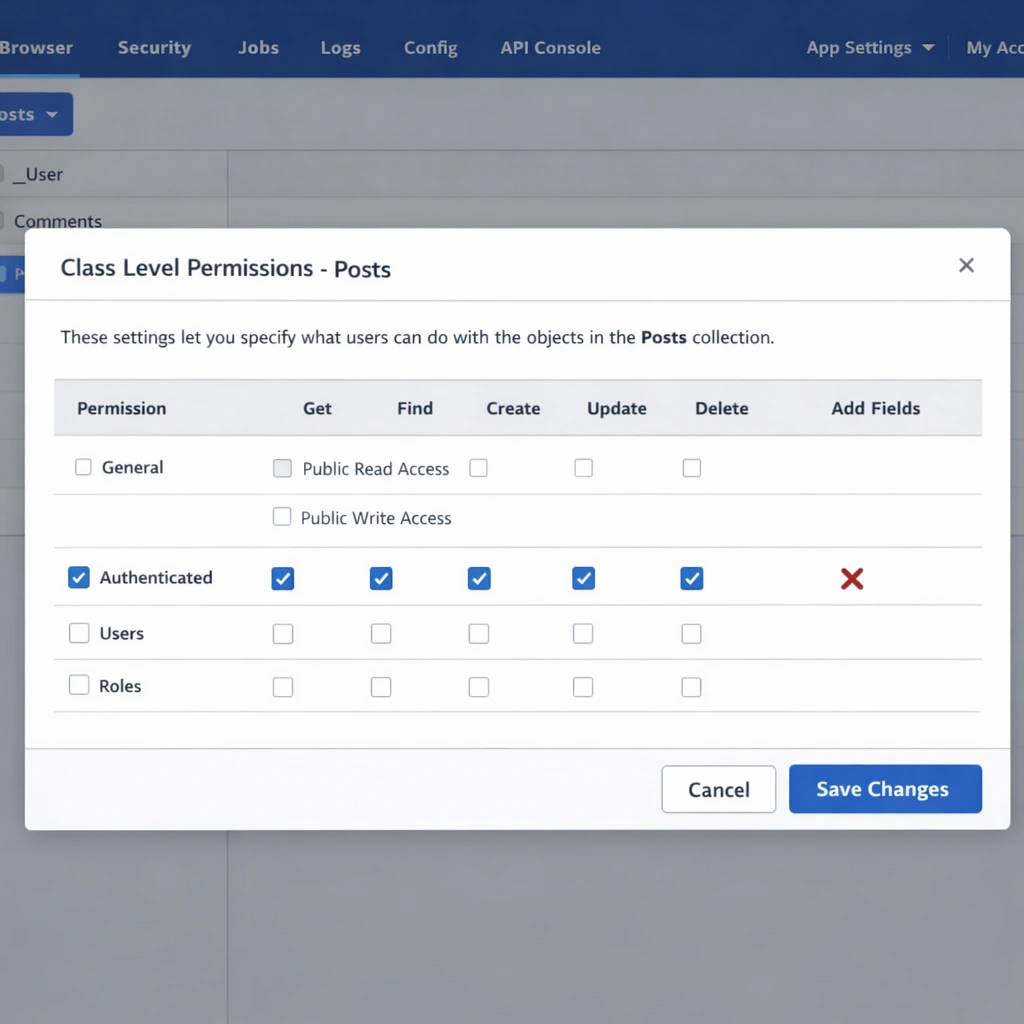
Parse Server class-level permissions
Parse Server’s class-level permissions — accessible from the Parse Dashboard under each collection’s settings — control which operations anonymous users, authenticated users, and specific roles can perform on a class. The production baseline for most SaaS products is:
- Get: authenticated users only
- Find: authenticated users only
- Create: authenticated users only
- Update: authenticated users only
- Delete: authenticated users only
- Add fields: disabled
Disable the Add fields permission in production. With it enabled, any authenticated user can add arbitrary fields to any object in the class, which creates a data integrity risk and a potential vector for storage abuse.
SSL enforcement and HTTPS configuration
Running a self-hosted backend over HTTP in production exposes every API request — including authentication tokens, session cookies, and user data — to interception on any network between your users and your server. SSL is non-negotiable for a production deployment.
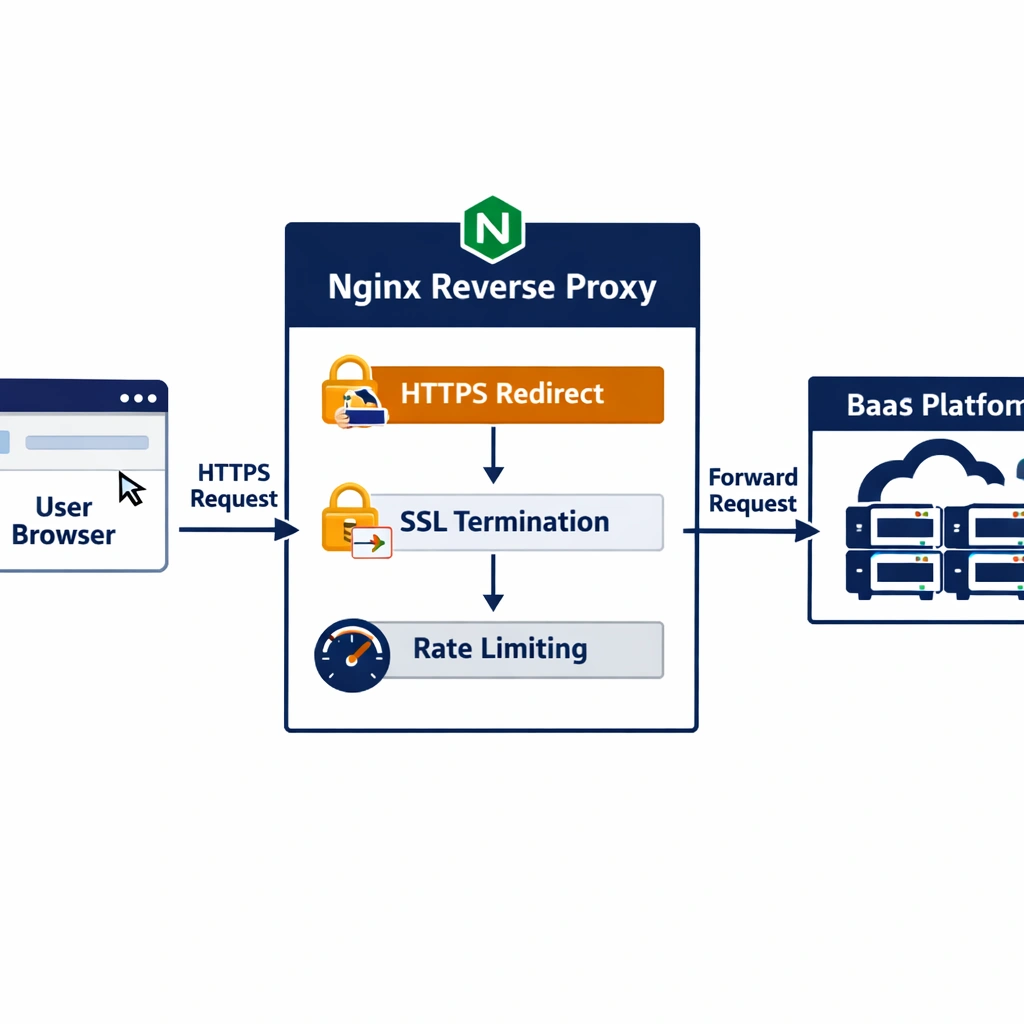
All three platforms support automatic SSL provisioning through Let’s Encrypt. Appwrite handles this internally during installation when you provide a valid domain. Nhost’s CLI configures SSL through your reverse proxy setup. Parse Server relies on an Nginx reverse proxy with Certbot for certificate management.
After SSL is configured, enforce HTTPS at the Nginx layer by redirecting all HTTP traffic:
server {
    listen 80;
    server_name yourdomain.com;
    return 301 https://$host$request_uri;
}
Add HTTP Strict Transport Security headers to your HTTPS server block to prevent protocol downgrade attacks:
add_header Strict-Transport-Security "max-age=31536000; includeSubDomains" always;This header instructs browsers to refuse HTTP connections to your domain for one year after the first HTTPS visit, eliminating the window during which a downgrade attack could intercept an initial unencrypted request.
Rate limiting and abuse prevention
A self-hosted backend without rate limiting is vulnerable to credential stuffing attacks against your authentication endpoints, enumeration attacks against your user lookup APIs, and storage abuse through repeated file upload requests. These attacks are automated, continuous, and do not require a targeted adversary — they come from botnets scanning for unprotected endpoints.
Nginx handles rate limiting at the reverse proxy layer before requests reach your BaaS platform:
limit_req_zone $binary_remote_addr zone=auth:10m rate=10r/m;

location /v1/account {
    limit_req zone=auth burst=5 nodelay;
    proxy_pass http://localhost:80;
}
This configuration limits authentication endpoint requests to ten per minute per IP address, with a burst allowance of five. Adjust the rate and burst values based on your application’s legitimate usage patterns — a product where users log in once per session needs a lower rate than one with frequent re-authentication flows.
Security monitoring for a self-hosted deployment
The monitoring setup that keeps a self-hosted backend security posture reliable over time does not require a dedicated security operations function. Three tools cover the requirements for an early-stage product self-hosted backend security
Fail2ban monitors your SSH and Nginx logs and automatically blocks IP addresses that produce repeated authentication failures. Install it with apt install fail2ban and configure a jail for your SSH port and your authentication endpoints. An IP address that fails SSH authentication five times in ten minutes gets blocked for one hour — automated brute force attacks stop producing results immediately.
Logwatch sends a daily email digest of your server’s log activity — failed SSH attempts, Nginx error rates, system authentication events — without requiring you to monitor logs manually. Install it with apt install logwatch and configure your email address in /etc/logwatch/conf/logwatch.conf.
Docker container health monitoring through UptimeRobot — covered in the self-hosted BaaS VPS deployment guide — completes the monitoring stack by alerting you when your backend API stops responding, regardless of whether the cause is a security incident or an infrastructure issue.
Conclusion
Self-hosted backend security is not a one-time configuration — it is a baseline you establish at deployment and maintain as your product grows. The firewall rules, secrets rotation schedule, access control configuration, SSL enforcement, and rate limiting covered in this guide represent the minimum viable security posture for a production self-hosted BaaS deployment. None of it is technically complex, and all of it is significantly cheaper than the alternative: discovering a data breach after it has already affected your users.